
How to Create a Docker Image From a Container
 By Amit Sharma,June 26, 2024
In this blog post, I’ll guide you through the process of creating a Docker container, modifying its internal state, and then saving the container as an image. This approach is particularly useful when fine-tuning how an image should be constructed, allowing you to adjust a running container until it meets your requirements. Once satisfied, you simply save it as a new image. Before diving deep into the steps, let’s explore some scenarios where you’d need to modify the image of a running container:
- Configuration Changes: Sometimes, you may need to update configuration settings or environment variables on the fly. This could be due to changing requirements or the need to optimize the application’s performance.
- Hotfixes: Applying a quick fix to a running application can sometimes be critical, especially in production environments. This allows for immediate resolution of critical issues without downtime.
- Development and Testing: During the development process, developers may need to make iterative changes to a container to test new features or fixes without restarting the container each time.
- Network Adjustments: Modifying network settings, such as opening new ports or changing IP configurations, might be required to adapt to changing network environments or requirements.
- Service Updates: In some cases, updating the software or libraries within a container without stopping it can be a way to ensure continuity of service while applying necessary updates.
However, it’s generally advisable to implement changes through updated container images and redeployments rather than modifying running containers. This approach ensures consistency, reproducibility, and easier rollback capabilities.
Step 1: Create a Base Container
Begin by creating a container from the command line. To keep this tutorial straightforward, we’ll use the Apache HTTP Server:
$ docker create --name apache_base -p 80:80 httpd:alpine

Unable to find image 'httpd:alpine' locally
alpine: Pulling from library/httpd
ec99f8b99825: Pull complete
5bb6b89bdc07: Pull complete
4d4f81a0e007: Pull complete
4f4fb700ef54: Pull complete
fb862023e65f: Pull complete
671f9bef4f4f: Pull complete
ef2b0f978abf: Pull complete
Digest: sha256:f32374473ef537ea79cb0d17cb5003c9f10c6b4bc885d0affcb5c37d63e3a3d3
Status: Downloaded newer image for httpd:alpine
a5ed4c3f9b36a545c980ca12a63aee08e26256b154392be9c4cf6ef6450c7f1d
This command sets up a new container named apache_base with port 80 exposed. We are using the httpd:alpine as our base image. If you don’t already have the httpd:alpine image, Docker will download it automatically, indicating the download progress and completion.
Step 2: Inspect Images
Once the container is created, you can check the images available on your system:
$ docker images -a

REPOSITORY   TAG       IMAGE ID       CREATED       SIZE
httpd        alpine    08cff95d4452   3 weeks ago   62.8MB
Step 3: Inspect Containers
Although the container is created, it’s not running yet. To see it in the list, use the -a flag:
$ docker ps -a

CONTAINER ID   IMAGE          COMMAND              CREATED         STATUS    PORTS     NAMES
a5ed4c3f9b36   httpd:alpine   "httpd-foreground"   4 minutes ago   Created             apache_base
Step 4: Start the Container
Start the container with the following command then access the default index page of the httpd server at http://localhost

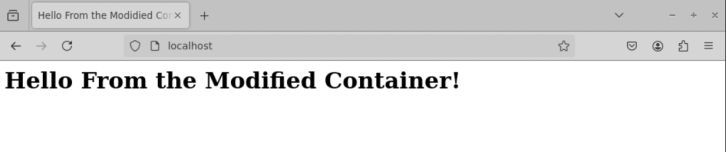
Step 5: Modify the Running Container
To modify the container, for instance, by changing its home page, create a new index.html:
<html>
<head><title>Hello From the Modified Container!</title></head>
<body><h1>Hello From the Modified Container!</h1></body>
</html>
Save this file, then copy it into the running container:
$ docker cp index.html apache_base:/usr/local/apache2/htdocs/index.html
Refresh your browser at http://localhost to see the updated “Hello From the Modified Container!” message.
Step 6: Create an Image From a Container
So at this point, we’ve updated the contents of a running container and as long as that container is around, we don’t need to do anything.
However, we want to know how to save this container as an image so we can make other containers based on this one. To do so, we execute the following Docker command:
$ docker commit apache_base
Step 7: Tag the Image
Tag your new image for easier identification. We need the image id for that, which we can get from running $ docker image -a. Replace [image_id] with the actual ID of the image you just created.
Step 8: Create Images With Tags
You can also tag the image as you create it to simplify the process by combining commit and tag in one step.
$ docker commit apache_base hello_world_httpd
Step 9: Delete the Original Container
Remove the original container:
$ docker stop apache_base
$ docker rm apache_base
Step 10: Create and Start a New Container with the New Image
Now you are ready to create a fresh container with the image created in step 8.
$ docker run --name hello_world -d -p 80:80 hello_world_httpd
Check http://localhost to confirm it shows the “Hello From the Modified Container!” page.
Step 11: Additional Options
Explore additional commit options, such as setting authorship or adding commit messages. For example, to set the authorship if you plan to make the image available to others so they know about the source of the image. You can also tag the image to describe the change you made.
The final option I will discuss is to apply instruction to the Dockerfile to change either the metadata information about the container or its behavior at runtime.
The --change option will apply Dockerfile instructions to the image that’s created. Supported Dockerfile instructions: CMD|ENTRYPOINT|ENV|EXPOSE|LABEL|ONBUILD|USER|VOLUME|WORKDIR
For example we can create a base nginx image with the following command. Then later on change the command to start the server:
$ docker commit --author="amit.sharma@observeinc.com" hello_world_httpd authored_image

$ docker commit --message="Apache Web Server with custom index.html" authored_image tagged_image

# Change Nginx command line argument by adding -T which dumps all runtime configurations:

$ docker commit --change='CMD ["nginx", "-T"]' nginx_base config_dump
$ docker run --name config_dumper -p 80:80 config_dump
The configuration for the nginx process will be dumped to standard out when you execute this command.
Conclusion:
This tutorial covers a comprehensive approach to modifying and saving Docker containers as images, using Apache HTTP Server as a practical example.
Observe is a modern observability platform that provides blazing-fast performance at a petabyte scale while reducing your total cost of ownership. Observe provides visibility into health and performance of containerized deployments at scale. You can run Observe agent as a Docker container or if you are running containerized apps in Kubernetes, you can connect your Kubernetes cluster with Observe using the helm chart to analyze high-cardinality cloud-native data.. Haven’t started your journey with Observe yet? Start today with a free trial.